Monday, 2 April 2012

DIY shirt pocket.

Original shirt from New Look.
I decided to add a boob pocket to an old t-shirt that I bought in a New look sale 2 years ago. 

First select a fabric in a colour you like. I found this silk sample book, you can buy these for around £1 in a lot of curtain shops etc. 


Cut out the fabric to a little bigger than the size you want the pocket to be, about half an inch around each side. I also decided to put a band of mint sheer fabric across the top of my pocket to make it a little more interesting.

Turn the pocket the wrong way around and fold the edges in on all sides. Along the top of the pocket you want to sew a seam to keep it tidy when the other 3 sides are stitched to the t-shirt. 


Then turn the pocket the right way around, pin it to where you want it to be placed on the shirt and stitch along all 3 sides as close to the edge as possible. I used a mint green thread for my pocket, ensure you use a thread you wont mind seeing as you'll be able to see it outside of the pocket. 


Monday, 12 March 2012

DIY collar

This is a primark mens shirt i got in a sale. I cut off the sleeves for summer.
It had a plain white collar which didn't look right so i got a piece of dip dyed denim which I used as a tester for a denim vest which i bleached. I attached the  denim to the collar the whole way around so it fades from denim to white. I the put black silk corners on the add something extra. 

Sunday, 11 March 2012

Thrifting Haul

These are a few things I've got from previous charity shop raids. I'll do one for this month after. 
Some of the clothes I've altered myself :3


Beginning of the ugly shirt obsession. This was like a size 14/16. I removed the sleeves and the took a few inches out from the side. The top button is really big so adds extra detail. 
This shirt was only £3 and topshop have finally caught on and started selling the vintage style shirts. 
Topshop shirt £38.00
£3.99 from a charity shop in the city centre

£3 Help the aged i liked this shirt mainly because of the crazy cuffs. It's like caramelly brown but has a golden tint.


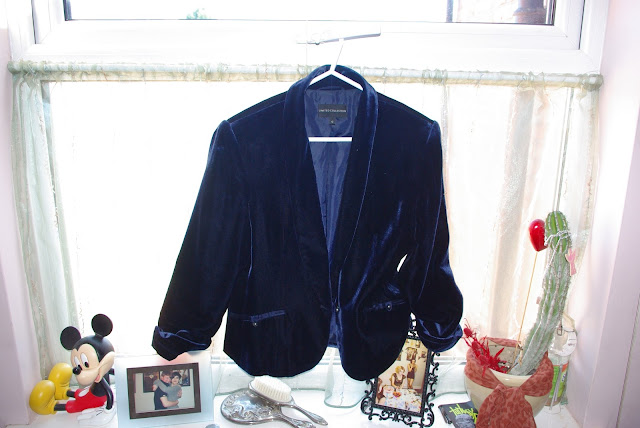
Crushed velvet jacket. £4 LOROS. 
I hate the feel of velvet when stroked the wrong way but it's so pretty, I loved the colour of this jacket and if deff a summer evening fave. 
House of Fraser Chesca velvet jacket £210
About 80% of my clothes are actually thrifted and redesigned so I'll continue to update these posts. 

Saturday, 10 March 2012

Sheer Maxi skirt DIY

Coming soon.

DIY union jack flag skirt


After lusting over the flag shorts I decided to revamp my Topshop skirt but with a British twist, The holes in the denim ripped more over time making it impossible to wear without looking like just a strip of denim so this was a easy way to make an original new skirt.

You will need:
+an old skirt [I chose this topshop skirt because the holes had torn making it impossible to wear]
+A union jack flag. [I got this from a charity event but they're available in most craft shops]
+Sharp scissors
+Pins
+ A sewing machine. 


 Lay the flag on the area of the skirt you want to be covered,I chose to do one front panel and one back as this was where the biggest holes were. Cut the piece to 2 inches bigger than the panel needs to be. 


Then fold the edges over and pin along the edge to create clean lines for sewing. 


Don't forget to pin along the pocket as well so they fabric is tucked inside it so you can still use the pocket. 


Repeat this process on the back, this time don't worry about the pocket, we will do this later. 


Using the sewing machine to sew as close to the seams as possible, I chose to use a mustard coloured thread as this matched the seams on the skirt. 


The pocket is slightly more difficult you can either hand sew or push the base of the sewing machine into the pocket of the skirt this allows you to access it to create the stitch. Don't forget to make sure the denim is in between the two sides of the flag!

Once you've completed this panel move onto the back. 

Sew along the side panel and along the top, ensuring that you don't stitch the back pocket shut! 
Once you've done that you are the ready to sort out the back pocket.
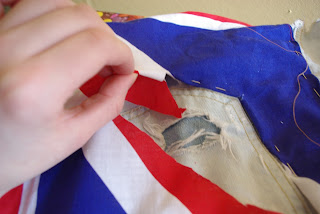
Cut a small hole into the fabric and create a cross going up to the corner of the pocket.
Then fold the parts of the cross in to create clean lines, pin these into place. 
For the top of the pocket you can simply tuck that triangle of fabric into the pocket. 
Stitch the other side and bottom and then sew along the outside of the pocket. Again sticking as close to the seam as possible [Don't worry about being to neat, I'm terrible at sewing straight lines]
Then remove any lose threads and you have completed your fixed skirt!